Sugar Swings! Serve Some

Sunday, June 5, 2011

baked donuts with sprinkles....!

baked donuts

....so i missed donut day on june 3rd...but had i realized it i would have broken out the donut pans i just got to celebrate...well better late than never and these are actually baked donuts which i've been meaning to try for ages.....i found a whole wheat recipe here @ sweet basil kitchen....and they are made with these....


...this is the first time i've used agave as the sweetener so i was really interested in how they would turn out....and i pretend they are a bit healthier for you (especially since i gave them to the kiddos for breakfast today...hey what can i say....aren't pancakes with a boatload of syrup just as bad for breakfast??)....

...i found the donut pans (mini and regular sized) at crate and barrel last week and for 10 bucks each which seemed like a bargain....


....i followed the recipe on the blog above but the batter was a little hard to get into the pans so after spending way too much time on the first 5 mini's....decided to go with a ziplock bag to pipe the rest in....this sped up the process like 10 times and it gave a better donut "shape" too....

.....bake @ 425 F for only about 5 minutes or so (or until the donuts spring back when you touch them....the donuts came out super easy (although i did spray the pans with pam before filling...)


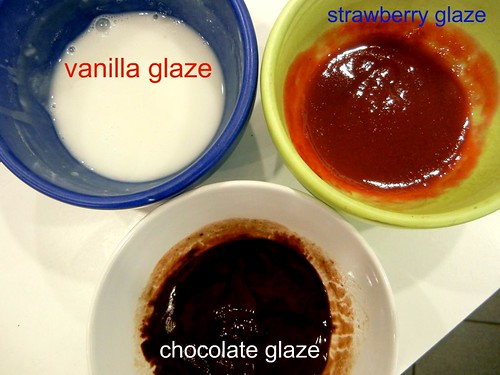
....made some quick glazes to dip them in...vanilla (3/4 cup of confectioner's sugar, 1 tablespoon of milk, and 1 teaspoon of vanilla), strawberry (about 2 tablespoons of strawberry jam mixed with about 2 tablespoons of the vanilla glaze), and chocolate (1/2 cup of semi sweet chocolate chips, 1 tablespoon of butter, and 1 tablespoon of the agave syrup---nuked in the microwave for about 25 seconds or until just melty)....

glazes

.....once you dip them, immediately add your favorite topping....i went with sprinkles.....


....and you get a bunch of pretty baked donuts topped with a bunch of crunchy goodness...and again since they are made with whole wheat pastry flour and agave syrup as the sweetener and baked versus deep fried...i hope they are a little better for you than the krispy kremes out there....or i pretend they are anyway...!

baked donuts

....i was a little worried about the kiddos enjoying them...but they totally gave them a thumbs up...i think the chocolate and sprinkles didn't hurt either....these are more cake-y than your normal fried yeast donut and the glaze is definitely a must....but very yummy and i would definitely make these again....i thought the red, white and blue sprinkle mix would be perfect for a 4th of july party too...!


....hope you have a great week and thanks for stopping by!...sharing at these awesome bloghops...

Thursday, June 2, 2011

thomas the tank engine and friends cake...!


....so this is the other cake made for the same weekend party as the brobee cake for my other 4 year old....he was super into thomas the tank engine until about a month before the party and then he became obsessed with these lego hero factory guys....

...have i pointed out before how smart those lego people are...?....not only do they have my 6 year old hooked on all the regular lego sets (he scans the catalog for hours dreaming of the next set he *has* to have or just looking at the sets and directions over and over again)....but they have these hero factory dudes (which started as bionacles but i guess hero factory sounds much better and they can sell more that way)....AND they upgrade them....meaning they make the same guys...change their gear slightly....and call them the 2.0 upgrades....meaning my guys have to have all the same hero guys AGAIN....but they need the *upgrades*......and guess what's coming out this summer....3.0 upgrades....!...are you kidding me??....like i said smart marketing machines over at lego....i'm definitely in the wrong business.....but i totally digress.....


....all the trains are made from royal icing (although i use candy melt a ton, these images needed more finer detail than you can get with the candy melt)....but i used the same technique...took some of our coloring book pages and reduced the images to the size needed for the cake....and then prepped all the royal icing and tinted the colors needed for the trains and details....then traced the images onto parchment with the royal icing....you can get some awesome tutorials on royal icing and how to pipe, flood etc on other sites like at Bake at 350....so i'll spare you those details...but for me i did these way ahead of time and let them dry just covered in parchment for like a couple weeks before i needed them which really saved time when assembling the cake (especially since i did 2 cakes in one night)....oh and because i didn't pipe onto cookies or fondant and only on parchment...i made sure the images were thick and not too fragile once dry (so they could be picked up and handled relatively easy)....some of that was done by layering on the royal icing....(unfortunately i did not get pics of this process---yeah i know some kind of blogger i am right??)....anywhoo this process is pretty easy but it is a little time consuming, so open a bottle of wine and try it out....!

...the cake is made with a square pan with 3 layers (each cut in half) and everything crumb coated....i don't think i ever had to make grey icing on purpose before (has happened by accident on occasion!)....so for this particular shade...i mixed some black royal icing with white buttercream...but that turned it a nice shade of purple....so google said to just keep adding some of each of the primary colors until you get the grey color you want....and it totally worked!....


.....the tunnel detail is made with a combo of yogurt covered raisins and hershey's cookies 'n' creme drops (which btw are delectable even if they do look like small rocks..)...the background to the tunnel is just store bought chocolate fudge frosting...once that was on and still wet....i put the trains on and pushed them in slightly (just be careful not to push too hard to crack the image)....

.....and finished up with some green "grass" around the edges...and you have a thomas and friends with grey buttercream cake...!...oh and his fav is james so he's on top...and the other trains are thomas, percy, henry, and hiro....he originally wanted them all to be *cross* but unfortunately i couldn't find pics of them that way....(personally i think that would have been a much better cake since these trains are always *cross* in the stories...


.....and this was all the reaction i needed...!


.....i have a feeling this is it for the "little kid" type of cake requests....i think the almost 7 year old is leaning towards another star wars guy for his birthday this august...but i'm still trying to talk him into a pencil cake...!

....happy june to all and thanks for stopping by....!

Thursday, May 26, 2011

candy lego men tutorial....!


....so after posting the lego dude valentines and the lego dude cupcakes.....i've gotten quite a few comments or emails about how to make them.....so here you go....my first "official" tutorial....(although i usually include how i do stuff in all my posts)....

....start with a lego minifigure ice cube mold....i got mine from an official lego store (for some reason my boys including the 41 year old seem to love that place...!)...but you can find them other places online or ebay probably has them too.....

....and you need candy melts of course...i use wilton but whatever kind you like and colors you want your dudes....for these i went with the traditional yellow, red, and blue.....i add mine to regular zip lock bags...and nuke them in the microwave until just melted...(about 30 secs or so depending on your microwave)....don't over melt....you want it just fluid enough to "pipe"...snip off an end of the bag to make a small tip....the key is to have all 3 colors ready to go at the same time and you have to work a little fast (so apologies for the kinda crappy photo pics!)....


....i start with the head....fill up about half way....don't go past the "ridge" between the head and the body or you will get the color over flowing into the body when it hardens.....


....then fill half way with a different color for the body and same with the pants...trying not to go past the "ridge" separating each section.....(if you are really motivated you can color the hands the same color as the head....but i'm usually not that motivated)...


....i stop once 4 are half way filled and then tap the mold on the counter to get the colors even....then fill the rest of the mold with the same colors again.....


....once the molds are filled....tap on the counter again....pretty hard to get make sure there are no air bubbles and to fill in all the sections of the mold....(you usually don't see the back of the lego guys as much so i don't worry about how that looks as much....you can see the colors run a bit into the different sections here)....


....i put them in the freezer for about 10 minutes then pop them out of the silicone mold (it's really easy to pop them out---never had any break doing this).....


....and you get an edible lego minifig dude.....


....or multiple lego mini fig dudes....!


....if you make these they usually get a pretty cool reaction from the kiddos or lego fans in general.....these were for a bake sale at the 6 year olds school yesterday...a cake with the lego dudes and some candy lego bricks i found at our local candy shop....


.....and cupcakes of course all wrapped up and ready to go....!


.....hope this is helpful and if you do make the lego guys....send a pic and let me know how they turned out....!

Monday, May 23, 2011

yo gabba gabba brobee cake....!


....if anyone has little kids like 6 and under....you may know this guy....he's from the kids show yo gabba gabba...it's kinda like a new version of sesame street...lots of pretty neat guest stars....lots of cool music....weird looking puppets...including this little dude....his name is brobee and he thinks hugs are fun....

....start with 2 sheet cakes ....these are 2 9X13 cakes...1 chocolate and 1 vanilla from boxed mixes....slice each in half to give 2 thinner layers....frost half and then add back the other half....

....then carve the brobee shape....which was based on a pic i found on google images (btw-what did cake makers do before you could go do a google search for a pic...? buy books?...go to the library?...i wouldn't even know where to start without the internet!)....i used part of the cut aways from the leg area to make the arms and filled in with extra pieces as needed to make it look "right"....


....then crumb coat.....


....then fill in the different color green stripes with frosting (and is it frosting or icing...? and is there a difference??)....to make it look like "fur" i used a wilton grass tip....the sides were a bit impossible to do with the grass tip since my hands warmed the icing too much seemed to not stick well to the sides....AND i was running out of dark green....AND the zip lock bag i was using sprung a hole near the icing tip....AND it was getting late and i was too lazy to make more icing so the sides were just iced any which way i could to cover it with the dark and light green together.....


.......brobee apparently has horns....so they were made with sugar cones dipped in red candy melt......his eyes are white icing and the black monobrow and outline around his eyes are black royal icing.....oh and the red mouth is candy melt too...


.....and you get brobee from yo gabba gabba.....anyone for a dancy dance....?


....this is 1 of 2 cakes for a party on saturday for my twins who recently turned 4!...plus i figured if i was going to get judged on saturday may 21, 2011...i was going to offer a choice of 2 kinds of cake to better my odds....because everyone likes cake...right?

thanks for peeking in on me and brobee and have a great week...!


Tidy Mom I'm Lovin It Fridays


Mouthwatering Mondays